}

Wednesday, December 4, 2013

How to Upgrade to Android 4.2.3 OS on Your Smartphone

To obtain the Android 2.3 OS for your smartphone, please visit the LG Mobile homepage and follow the instructions below:
  1. Visit the LG Mobile homepage (http://www.lg.com)
  2. On the map, choose your country
  3. Select “Support > Mobile Phone Support
  4. Find the model number of your phone.
  5. Click on and install  “WINDOWS USB Driver”
  6. Click on “Software Update” and execute the “.exe” file
The LG Mobile Support Tool will be installed automatically
  1. Connect your smartphone to the PC using the USB Cable
  2. Click on “Start Updating”
Note:
The “Start Updating” button will be activated only if there is new software available
  • After completing the upgrade, unplug the phone.

For more information on the software upgrade, such as available models and detailed explanations, please visit www.lg.com.

Tuesday, December 3, 2013

How to Save Web Pictures on the iPad

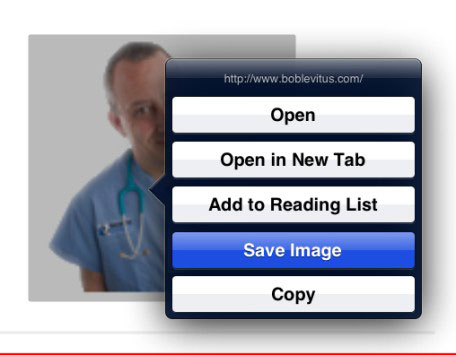
  1. Press your finger against the image.
  2. Tap the Save Image button that appears, as shown in the figure (or tap Copy, depending on what you want to do with the image):
    • Saved images end up in your Photos library (Saved Images on an iPad; Camera Roll on an iPad 2 or third-generation iPad), from which they can be synced back to a computer.
    • If you tap Copy instead, you can paste the image into an e-mail or as a link in a program, such as Notes.
  3. In some cases, typically advertisements, you also see an Open button or an Open in New Tab button, which takes you to the ad image.
    Hold your finger against a picture in Safari to save it to the iPad.
    Hold your finger against a picture in Safari to save it to the iPad
     
    thanks enjoy my tutorial 

Tuesday, October 29, 2013

SAMSUNG GALAX TAB BEI POA


SPECIFICATION

Operating System: Android 4.0
Function Comb: Web Camera WIFI 3G
Display Resolution: 800x480
Bundled Items: Screen Protector Charging Dock
Chinese Popular Brand: GP708
 Memory Capacity: 512MB
Screen Size: 7 inch
Location: Hongkong
Processor Main Frequency: Single Core
Screen Type: Capacitive Screen
Processor Brand: ALLwinner
Hard Drive Capacity: 4GB


Thursday, October 10, 2013

KASPERSKY ANTIVIRUS 2013 1 YEAR LICENSE KEY

Kaspersky Antivirus 2013 1 year license key
this is not a new promo, but I have just recollected the links and tutorials from various comments of the original post
http://malwaretips.com/Thread-Giveaway-K...-ROG-Users

Well, if you are using one of these motherboards

Rampage IV series
Maximus V series
Maximus IV series
Crosshair V series motherboards

then go HERE and download your Kaspersky Antivirus 2013 special installer, no additional activation code is required to activate full version.

But if you don't own one of these motherboards above then follow these steps :

1. First off, if you don’t already have it, you will need to download and install the 7-Zip archiver (version 9.20 or higher is required)
go to this official page to get the proper one to your system architecture
http://7-zip.org/download.html

2. Go to the Asus Kaspersky page and download the KAV13014190_ROG.zip file
HERE

[Image: kaspersky-asus-rog-download-page.png]

3. Once downloaded, right click on the zip file and “Extract Here…” to produce a setup executable. Then right click again and extract the setup installer file contents to a folder.

[Image: extractkavinstaller.png]

4. Go into the folder you extracted, right click on the kavkis.msi and choose to “Extract Here…”. This will extract a single cbi.dll file which is the activation file for Kaspersky Antivirus. Right Click and Copy or Cut the cbi.dll file.

[Image: extractcbidll.png]

5. You need to manually create the Kaspersky Anti-Virus directory structure and paste the cbi.dll into it. Go to C:\Program Files\ and create a folder “Kaspersky Lab”. Go into that folder and create another folder called “Kaspersky Anti-Virus 2013″, the structure will look like this for 32-bit users:

C:\Program Files\Kaspersky Lab\Kaspersky Anti-Virus 2013

or the following for 64-bit users:

C:\Program Files (x86)\Kaspersky Lab\Kaspersky Anti-Virus 2013

Paste the cbi.dll into the Kaspersky Anti-Virus 2013 folder.

6. Now you need to create another directory structure, go to C:\ProgramData and create the folders “Kaspersky Lab”, then “AVP13″ inside that, and “Data” inside that to produce the following structure for Windows Vista, 7 and 8. The ProgramData folder is hidden by default so if you can’t see it in the root of C, type C:\ProgramData into the Search box on the Start menu or configure Windows to show hidden files and folders from Folder Options found in Control Panel.

C:\ProgramData\Kaspersky Lab\AVP13\Data

For Windows XP the Kaspersky Lab folder is in Documents and Settings:

C:\Documents and Settings\All Users\Application Data\Kaspersky Lab\AVP13\Data

7. Go back to the KAV ROG folder from step 3 and double click to open the kavkis.cab file (not the msi from earlier). Inside you will find the Kaspersky license file with a name of _1AA7CD13.key. Right click and copy it, then paste the key file into the Data folder created from step 6.

[Image: kavcopy-license.png]

8. Now the Asus ROG license files are in place, it’s time to download the Kaspersky Anti-Virus 2013 setup installer from the Kaspersky website
http://www.kaspersky.com/anti-virus-latest-versions
hen simply install the package as usual, it probably makes no difference whether you choose to participate in the Kaspersky Security Network (KSN)

Once the Kaspersky Anti-Virus 2013 program has installed, that’s it, you don’t have to do anything else because the program installs and activates itself automatically using the key from the ROG installer. Just make sure you have internet access during the process. If you look at the licensing details when the main interface pops up, you will see the activation has been applied and you have 365 days left!

------------------------------------------------------------------

OR

You can use this autoinstaller
1. Download and click the Auto installer (free_kaspersky.exe) - Virustotal ( 2 False positive)
for: x86 - x64 (xp,vista, win 7 , win 8 )
https://www.box.com/s/6b5rfw3ipt1cvzt1lc2v

2. Download and install your kaspersky Antivirus
http://www.kaspersky.com/anti-virus-latest-versions


Enjoy! Big Grin

"If at any friendly service you immediately think of gratitude, then you have hot gave it, but sold it."

Monday, September 30, 2013

How to install and run Whatsapp on your Windows PC

WhatsApp on PC
Meaning of this site.
This site will teach you how to install and use whatsapp on your PC computer easy and quick.
Everyone is used to whatsapp on the mobile phone, but a few know u also can have it in use on your dekstop.
We will help you step by step to accomplisch this. There is also video material to make it even more simple.
When you don’t have the ability to use whatsapp on your phone, or just want it on your computer, this is the site you are looking for.

Here are some screenshots


Step 1


Android application
First you have to download an android programm on your personal computer.
This has to be done before you download the Whatsapp application.
We need this programm to make use of Whatsapp, because this programm acts like it is your mobile phone.
The programm is an android emulator.

Nowadays I use a free application called Bluestacks. You can download This application  here:

It is very userfriendly and it is also available for MAC users. Also can you synchronize this program
with your android apps on your phone when you like that!!
here is an instruction for that:
We did recommend “Youwave” in the past. Although it works fine it is limited by a 7 day trial period.
When you dont mind paying after several days or you just want to check the trial out.
Youwave is downloadable here:  http://youwave.com/download.html


Step 2


Whatsapp on your android application
When we have installed one of the android applications, we need to get Whatsapp installed in this application.
I will explain how to this for both applications from step 1.
For Bluestacks users. After you start Bluestacks and it is loaded , simply go to the search line and type in Whatsapp and download it.
It will appear among the other apps which are preinstalled.
For Youwave users. The easiest way to do this is to use the  Youwave application itself for it.
So we open and start Youwave. Click on view on top and click on online content.
We can see the Whatsapp icon beneath the online apps (click and run ). Click on it and run it.
This will download Whatsapp and place it in your Youwave. After it is done you can see the icon on the home page of Youwave.
You  also can download and install Whatsapp with the browser of Youwave going to this site:


Step 3


How to setup Whatsapp on your pc

After the Whatsapp application is installed and you run it, it will  asks for your personal details.
You have to fill it in and keep your phone in the near area. The number you fill in has to be correct.
You even can use your home phone instead of a mobile phone.
First you will get a text message from Whatsapp with a 3 digit number.
The install screen of Whatsapp will ask you to click on “call me”.
When u click on “call me”, an automatic call is made to your phone number.
A voice will tell you the same 3 digit number as the number they send you by text message. Fill in this number.
Last step is to fill in your name or nickname. Verification is complete and you are ready to useWhatsapp.
In step 4 we will learn you to add contacts and to useWhatsapp.


Step 4


Add contacts and whatsapp in use
To use whatsapp go back to your home screen of youwave or bluestack.
For Bluestack users
Just open your whatsapp application and click on the black menu button on the bottom left.
When you click on it you see contacts in the list. Click on it and add contacts.
After adding contacts, you can just click on your contacts to chat with them via whatsapp.


For Youwave users
Keep in mind this application is a replacement for a mobile phone. This way the contacts have to be added in the android application and not in whatsapp, like other messengers request.
Youwave is the main programm and whatsapp is an add.
On the home page of youwave we click on the green phone icon. We get a sort of call screen. Here we type in the number of a contact, who uses whatsapp. Next we click at the bottom on menu and click on add to contacts, next we click on create a contact and fill in the name details. This way we can add many contacts.
When you are in the contact list just click a contact and when he or she has whatsapp you can click on Whatsapp icon and chat with this contact.
You also can click on the whatsapp icon on the home page of youwave and click on the pencil for all contacts that use whatsapp.
Enjoy your whatsapp on your computer!

Friday, September 13, 2013

How to Use Your Android Phone as a Portable Wi-Fi Hotspot

  1. Go to the Settings screen on your Android phone. You can get there by pressing the menu button on your device when you're on the home screen, then tapping "Settings".
  2. At the Settings screen, tap the "Wireless & networks" option.
  3. You should see an option for "Portable Wi-Fi hotspot". Click the check mark beside it to turn on the hotspot and your phone will start acting like a wireless access point. (You should see a message in the notification bar when it's activated.) To adjust and check the settings for the hotspot, tap the aptly named "Portable Wi-Fi hotspot settings" option. You'll need to do this if you don't know the default password that will be created for your hotspot so you can make a note of it for connecting your other devices.
    • You can change the default password, security level, router name (SSID), and also manage users connected wirelessly to your phone in the Wi-Fi hotspot settings.

Find and Connect to the New Wi-Fi Hotspot Created

  1. From each of the other devices you want to share Internet access with, find the Wi-Fi hotspot; this will probably be done automatically for you. (Your computer, tablet, and/or other smartphones most likely will notify you that there are new wireless networks to connect to. If not, on another Android phone, you'll find the wireless networks under Settings > Wireless & networks > Wi-Fi settings. See general Wi-Fi connection instructions for most computers.
  2. Finally, establish the connection by entering in the password you noted above.

Tips and Considerations

  • Make sure you turn off the Wi-Fi hotspot feature when you no longer need shared Internet access from the other devices, since this can drain your cell phone's battery significantly.
  • By default, the portable Wi-Fi hotspot will most likely be set up with WPA2 security and a generic password. If you're using this feature in a public place or concerned about hackers trying to intercept your data, it's best to change the password to something else before broadcasting your signal.
  • Keep in mind again that your cell phone company might charge extra for this feature and/or have data restrictions on its usage, so make sure you check your plan or with your carrier for more information.

Monday, September 2, 2013

4.5 inch Haier W910 Android 4.0 3G Smart Phone Dual Core 1.5GHz HD 720P Gorilla Glass IPS GPS (Black)

4.5 inch Haier W910 Android 4.0 3G Smart Phone Dual Core 1.5GHz HD 720P Gorilla Glass IPS GPS (Black)


Now: Tsh 320,000/=


PATA SIMU SAFI SMARTPHONE KWA BEI NZURI YENYE UWEZO MZURI NA YENYE FLASH LIGHT


4 inch S4 mini Android 4.1 Smart Phone DMDK4x12 1GHz HVGA Screen Dual SIM Quad Band WiFi - White

Now: Tsh 300,000/=

5 inch BML I9505 Android 4.1 Smart Phone SMDK4x12 1GHz WVGA Screen WiFi Bluetooth Dual Cameras - Royal Blue


5 inch BML I9505 Android 4.1 Smart Phone SMDK4x12 1GHz WVGA Screen WiFi Bluetooth Dual Cameras - Royal Blue

CS0071802
Now: Tsh 350,000/=

Saturday, August 10, 2013

Activate and Use iPhone 4 without having a SIM Card

Before proceeding ahead, there are some very important facts that should be discussed. You can use this tutorial for activating a SIM card on iPhone 4 only. It cannot be used for any other iPhone. One more thing should be clear that you need to download some apps that have been mentioned below.


Steps to Activate iPhone 4 without SIM Card

Step 1: First, you should run redsn0w and select IPSW from extras.
Step 2: You need to select a firmware and be sure it successfully identified. If the firmware you have selected is not able to identify, it means your file of firmware is corrupt and you need to download it again from any online source.
Step 3: Now return and click to the option “Jailbreak” that will be completed in a few seconds.
Step 4: You also need to check the box in front of “Install SSH”.
Step 5: Your device needs to be kept into DFU mode once you have done the above mentioned four steps.
Step 6: Now you need to select the redsn0w and keep pressing the “Power” button for a few seconds.
Step 7: Now you need to press the power button along with the “Home” button for about 10 seconds.
Step 8: Now you will see a message appears on your screen that redsn0w is jailbreaking your iOSdevice.
Step 9: The iPhone 4 will restart now. You need to launch iExplorer now.
Step 10: Now move to the root folder where you should select the option of “Apps”.
Step 11: You need to remove the “Setup.app” that can be searched by scrolling down the list.
Step 12: Restart your iOS device and your process will be finished.
So, you have completed the process of activating your iPhone 4 without using a SIM card and you will see no activation screen now.

Tuesday, July 23, 2013

UNLOCK HUAWEI Y3OO

TUNA UNLOCK HUAWEI ZOTE NA KUWEZA KUTUMIA LAINI TOFAUTI
 KAMA VILE VODACOM, AIRTEL, ZANTEL NA SASATEL...........NK

how to install windows server 2008 step by step

Windows Server 2008 R2 and Windows Server 2008
Welcome to the Windows Server® 2008 R2 and Windows Server 2008 TechNet Library. You have discovered the most comprehensive and up-to-date library for technical information about Windows Server 2008 R2 and Windows Server 2008. The content in this library is authored by the Windows Server Information Experience (WS iX) team. The WS iX team works directly with Windows Server software designers, developers, and testers in an effort to bring you the most technically accurate content about Windows Server that is available anywhere. Windows Server 2008 R2 and Windows Server 2008 are the most advanced Windows Server operating systems yet, designed to power the next generation of networks, applications, and web services. With these operating systems you can develop, deliver, and manage rich user experiences and applications, provide a highly secure network infrastructure, and increase technological efficiency and value within your organization. Learn more To find content for both Windows Server 2008 R2 and Windows Server 2008, browse using the sections provided below.
complete configure windows

Monday, June 24, 2013

VLC MEDIA PLAYER FREE DOWNLOAD

DOWNLOAD http://get.videolan.org/vlc/2.0.7/win32/vlc-2.0.7-win32.exe
VLC is a free and open source cross-platform multimedia player and framework that plays most multimedia files as well as DVD, Audio CD, VCD, and various streaming protocols Version 2.0.7  •  Windows

Monday, June 3, 2013

Acer Aspire one D255 Driver for Windows 7

http://aceh-soft.blogspot.com/2012/10/acer-aspire-one-d255-driver-for-windows.html